
Reviewed · CITY TOURS
Copenhagen City Of Lights PhotoWalks Tour
Copenhagen glows after dark. This 3-hour Copenhagen City of Lights photo walk turns the blue hour into a practical photography lesson, with your guide focused only on your group.
I love that you get real instruction, not just a sightseeing stroll. A professional photographer guide helps with composition and camera settings, so you’re aiming at better shots, not just pressing the shutter.
One thing to plan for: you’ll be doing longer exposures, so you really need to bring a tripod. Also, based on typical timing, this is more sunset-to-night than truly late-night.
In This Review
- Key takeaways for City of Lights photographers
- Copenhagen City of Lights at night: why it works
- Price and what makes it good value
- Where you meet and how the route makes sense
- Photo Exploring: the blue hour plan that drives the best shots
- Nyhavn at lights-on time: the easiest place to get wow photos
- The Queen’s palace area: strong architecture, calmer lighting
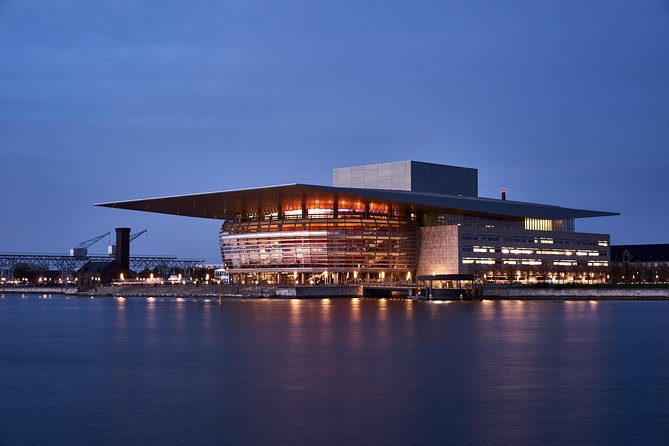
- Opera House energy: contrast, geometry, and creative angles
- Parliament area: long exposure practice with city-scale scenes
- Composition and exposure lessons you’ll actually use
- Post-processing tips: making night shots feel like you
- The tripod requirement, and how to make it work without stress
- Timing note: it’s sunset to night, not late-night
- What you can expect from a private group setup
- Practical tips to get better results right away
- Who this tour fits best
- Should you book Copenhagen City of Lights PhotoWalks?
- FAQ
- How long is the Copenhagen City of Lights photo walk?
- Is the tour private?
- What language is the tour offered in?
- Do I need a tripod?
- Where does the tour start and end?
- What kind of photography skills will I learn?
- Does the tour operate in bad weather?
- Is there an admission ticket included?
- What if I want to cancel?
- Is the tour suitable for beginners?
Key takeaways for City of Lights photographers
- Private instruction with your own photo tempo, so you can ask questions and slow down when needed
- Blue hour to night lighting for shots with city glow and longer-exposure opportunities
- Manual camera settings coaching (aperture, shutter speed, ISO) tied directly to what you’re photographing
- Composition tools like perspective, lines, and color, so photos look intentional
- Post-processing tips to help you finish your images beyond the camera
Copenhagen City of Lights at night: why it works
Copenhagen changes character when the light drops. You go from soft, leftover daylight to the city turning on its own lighting, and that shift is exactly what night photography needs.
This photo walk is built around that moment between blue hour and full night. That’s when you can capture atmosphere without everything becoming a single flat glow. The city streets, facades, and water reflect light in layers, which is great for photos that feel like Copenhagen, not just like any night city.
You’re not just wandering. You’re learning why one exposure works and another doesn’t, and you’re applying it immediately on the landmarks as the scene evolves.
Even more Things to Do in Copenhagen
Price and what makes it good value
At $233.63 per person, this isn’t a bargain-basement group tour. The value comes from two things you rarely get together.
First, it’s private. That means your photographer guide can concentrate fully on composition and settings for your group. Second, you’re paying for teaching: manual camera settings, how light behaves at night, and how to use long shutter speeds in relation to the scene.
If you have a camera and want to stop guessing at night, a guided session like this can be a smart shortcut. You spend 3 hours getting targeted coaching in the exact places where the results matter, like Nyhavn and the Opera area.
Where you meet and how the route makes sense
The tour starts at Memorial AnchorNyhavn 1F, 1051 København, Denmark. It ends back near your start area, finishing at the Metro station at Kongens Nytorv.
That matters because the route is practical. You’re walking through central Copenhagen where major landmarks are close enough to cover within a few hours, and where public transportation keeps your options flexible if you want to extend the evening afterward.
Expect an all-weather walk. Dress for the elements, because the best night shots often require you to stand still for a moment while your exposure does its work.
Photo Exploring: the blue hour plan that drives the best shots
The heart of the experience is the timing. The walk is designed to capture a transition: just before sunset, during blue hour, and then into night lighting when Copenhagen becomes more mellow and cinematic.
Your photographer guide uses that change to teach you a key concept: light is not fixed at night. It shifts minute to minute as street lamps, building lights, and reflections settle in.
So your camera settings will not be one-size-fits-all. You’ll learn how to adjust exposure as the city changes, instead of relying on one setting and hoping it works for everything you see.
A key detail from the experience setup: you should expect longer exposures. That’s why a tripod is required. If you’ve never used one at night, this tour is a good place to learn, because your guide can help you set up and frame so your long shutter shots look sharp and intentional.
More of Copenhagen covered in one go:
- Copenhagen: Group Walking Tour – City Highlights – 2 Hours
★ 4.7 · 1,088 reviews - City Sightseeing Copenhagen Hop-On Hop-Off Bus Tour
★ 3.5 · 800 reviews - 3-hour Copenhagen City Highlights Bike Tour
★ 5.0 · 757 reviews
Nyhavn at lights-on time: the easiest place to get wow photos
Nyhavn is the kind of location that instantly rewards night photography. The old buildings, the harbor setting, and all the lit windows give you a built-in composition system.
When the light turns on, you’ll be able to photograph:
- the classic channel view with warm building lights
- reflections that add a second layer to your image
- angles where the perspective leads the eye through the frame
This is also a nice learning ground. Even if you’re new, your guide can show you how to simplify the scene. Instead of trying to capture everything at once, you’ll pick one main subject, then build the photo using lines, color, and framing.
If you already know manual settings, Nyhavn becomes an excellent practice zone for comparing shutter speed choices. Small changes can make reflections more defined or more silky.
The Queen’s palace area: strong architecture, calmer lighting
Moving through the central sights brings you toward more formal architecture, including the Queen’s palace. This part of the route is valuable because it helps you practice photographing grand buildings in low light without them turning into flat silhouettes.
What you’re aiming for here is structure. At night, light can make edges pop, and the right exposure can preserve detail in windows and stonework. Your guide helps with composition so you’re not just photographing a building, you’re photographing the way light reveals it.
It’s also a good place to work on perspective. Night street scenes can become cluttered quickly, and your guide’s instruction on lines and viewpoint helps you choose cleaner frames.
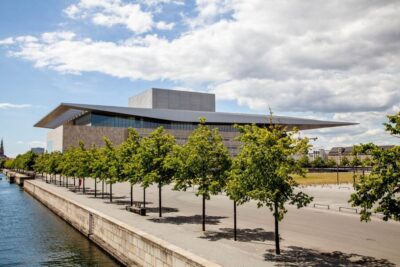
Opera House energy: contrast, geometry, and creative angles
The Opera House is another standout stop on this route. Why it’s great for a photo walk is simple: it mixes strong shapes with bright lighting.
You’ll have opportunities to shoot:
- wide angles that show the massing and surrounding lights
- tighter compositions that emphasize geometry and glow
- frames where the building lights contrast with darker sky
This is where your guide’s composition coaching pays off. Night photography often fails when photos feel random. Better composition makes your image feel planned, even when the scene is chaotic around you.
Also, if you want to practice creative color, this is a solid spot. Artificial light sources can create different tones across surfaces, and learning how to use that color instead of fighting it will help your photos look more like what you saw.
Parliament area: long exposure practice with city-scale scenes
The parliament area gives you a different kind of night challenge. This is a good stop for learning how long exposures behave when there’s a larger scene and multiple light sources.
Long shutter speeds can be tricky. Too long, and you lose clarity where you need it. Too short, and everything looks underwhelming. The guide helps you connect settings to results, including how shutter speed relates to the brightness and motion in the scene.
If you’re practicing manual camera settings, this part of the walk can help you connect the dots between:
- shutter speed choices
- how ISO affects brightness and noise
- how aperture changes depth of field
You’ll likely also get practical tips that apply to scenes beyond Copenhagen.
Composition and exposure lessons you’ll actually use
The tour is set up as sightseeing plus instruction, and it’s the instruction that makes the photos more consistent.
Here are the specific skills you can expect to work on during the walk:
- manual settings like aperture, shutter speed, and ISO
- creative composition using perspective, lines, and color
- understanding and controlling the influence of light
- tips and tricks for post-processing
- using long shutter speeds in relation to what’s in front of you
I like that the teaching is not abstract. You don’t just hear about settings. You apply them to actual Copenhagen scenes, then adjust when the light changes.
That feedback loop is what helps you build confidence. The goal is not just one great photo, it’s learning how to get great photos again later.
Post-processing tips: making night shots feel like you
Night photos can look different on your screen than they do in the field. That’s where post-processing comes in.
The tour includes post-processing tips, which means you’re not leaving with a memory card full of guesswork. Instead, you get guidance on how to make your images look more natural and more true to the atmosphere you saw.
You can think of it like finishing school for your night shots. If you already edit photos, the tips can help you refine your workflow. If you don’t edit much, you’ll at least understand what matters most after capture.
The tripod requirement, and how to make it work without stress
A tripod can feel like extra hassle, but this tour needs it for longer exposures. Here’s how to think about it so it doesn’t slow you down more than it should.
Bring a tripod you can deploy quickly. Once you place it, you want to avoid fiddling for long periods because night scenes are always changing.
Before you start, take a minute to practice:
- setting up fast
- checking that your frame is stable
- confirming your camera settings match what your guide is coaching
This is also why the guide being patient is such a big deal. Setting up, composing, and testing exposures takes time, especially when you’re learning.
Timing note: it’s sunset to night, not late-night
One review signal to pay attention to is the wording around lights and late sunset. Based on the typical evening window used for the walk, you’re likely out roughly from 6 to 9 pm. So if you’re picturing Copenhagen after much later nightlife ramps up, this might feel more like a golden night window than a very late-night shoot.
That said, the late part of that window is still great for reflections and landmark lighting. The goal is to capture the moment when the city lights come on and the scene becomes atmospheric.
What you can expect from a private group setup
Because it’s private, you’re not stuck with one-size-fits-all pacing. Your guide can tailor the walk to your needs, whether you’re brand new to night photography or you already have experience.
You can bring up to 3 friends or family members included in the price. That’s useful if:
- you want photography instruction but still want company
- your group has mixed camera experience
- someone can help you spot compositions while the guide teaches settings
Just keep in mind it’s still an instruction-focused walk. You’ll get the most out of it if your group is ready to pause for shots and adjust settings as the light changes.
Practical tips to get better results right away
If you want to leave with photos you’re excited about, you can prepare in a few simple ways.
- Know your camera basics. You don’t need to memorize everything, but you should know where aperture, shutter speed, and ISO live in your menus or dials.
- Charge your battery fully and bring an extra if you have one. Night shooting uses more power, especially if you review and adjust often.
- Wear shoes for uneven sidewalks and standing still. You’ll likely be stopping frequently for framing and long exposure tests.
- Be ready to think about light. Instead of only aiming at landmarks, look at what’s bright, what reflects, and what creates contrast.
The guide’s job is to help you translate what you see into camera settings. Your job is to come curious and ready to try.
Who this tour fits best
This tour is a strong match if you:
- want a photography lesson tied to real locations
- have a camera and want confidence with manual settings
- enjoy night atmospheres and reflections
- prefer a private guide who can adjust teaching to your pace
It also works well if you are new. The walk is structured to make the learning gradual, and the guide supports both new and experienced photographers.
Where it may not be ideal is if you strongly dislike gear setup. Because of the tripod and longer exposures, this is not a walk where you can simply keep moving and shoot handheld the whole time.
Should you book Copenhagen City of Lights PhotoWalks?
I think this is worth booking if you want more than pretty photos of Copenhagen. The private format and professional photographer guide make it feel like a guided class in night photography, set in one of Northern Europe’s most photogenic cities.
Book it if you’ll bring a tripod and you’re ready to practice manual settings. You’ll likely come away with a clearer process for exposures, composition, and finishing your images.
Skip it if you want a casual, keep-walking sightseeing tour. The focus here is on teaching and getting technically better night shots, and that requires patience and setup time.
If you want a 3-hour investment that helps you understand night photography so you can keep shooting long after Copenhagen, this one is a solid choice.
FAQ
How long is the Copenhagen City of Lights photo walk?
The tour runs for about 3 hours.
Is the tour private?
Yes. It is a private tour, exclusive to your group. You can bring up to 3 friends or family members included in the price.
What language is the tour offered in?
The tour is offered in English.
Do I need a tripod?
Yes. You are required to bring a tripod because longer exposures are part of the experience.
Where does the tour start and end?
It starts at Memorial AnchorNyhavn 1F, 1051 København, Denmark. It ends back close to the meeting point, finishing near the Metro station at Kongens Nytorv.
What kind of photography skills will I learn?
You will learn manual camera settings such as aperture, shutter speed, and ISO, plus composition techniques, how to control the influence of light, and tips for post-processing and long shutter speeds.
Does the tour operate in bad weather?
Yes. It operates in all weather conditions, so you should dress appropriately.
Is there an admission ticket included?
An admission ticket is marked as free for the activity.
What if I want to cancel?
Free cancellation is available. You must cancel up to 24 hours in advance for a full refund.
Is the tour suitable for beginners?
Most people can participate, and the guide is set up to support both new photographers and those with years of experience.
The latest around Copenhagen
- Copenhagen: Guided Tour of Vesterbro and Christianshavn★ 5.0 · 1 review
- Stevn Klint UNESCO Heritage Tour and Vikingborg Fort.★ 5.0 · 1 review
- Historical Pod Walk Tour on the Slaves of Copenhagen★ 5.0 · 1 review
- Copenhagen Old Town, Nyhavn, Canal Walking Tour & Christiana★ 5.0 · 1 review
- Queer Copenhagen Historical Tour★ 5.0 · 1 review
- Castle Island’s Royal History: A Self-Guided Audio Tour of Slotsholmen★ 5.0 · 1 review
City Tours, compared.
Group Walking Tour – City Highlights – 2 Hours
Read our review →
City Sightseeing Copenhagen Hop-On Hop-Off Bus Tour
Read our review →

City Card with 40+ Attractions & Hop-On/Off Bus
Read our review →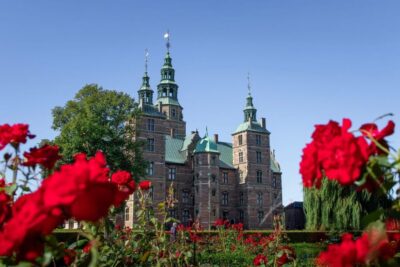
Browse the lists this tour appears in